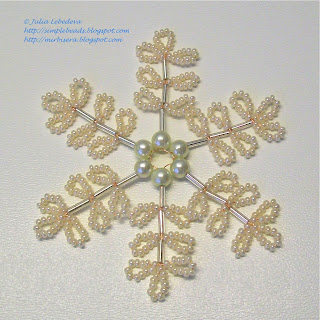
Winter is getting closer, and today we will do another product of "winter" series - a beaded snowflake.
We will need:
- seed beads #10;
- round beads 6 mm in diameter;
- bugle beads #3;
- 130 cm of wire 0.3 mm in diameter.
String one round bead onto the wire and place it at a short distance from one of the wire’s ends.
Take the shorter end of the wire and pass it through the bead from its reverse side.
Tighten the wire, thus fixing the bead with a wire loop. We need it to make sure that the bead will not move during the weaving process. As soon as we finish weaving we will unravel this loop.
Make further weaving using only the longer end of the wire.
String one bugle bead and 12 seed beads onto the wire.
Pass the wire through the first seed bead in the opposite direction.
Move the set closely to the round bead and tighten the wire. We’ve got a beaded loop.
Then string 12 seed beads onto the wire,
and after that pass the wire in the opposite direction through the first seed bead of the recent set.
Move the set of seed beads close to the product and tighten the wire. We’ve got the second beaded loop. Two beaded loops together with the bugle bead form the first tier of the snowflake’s branch.
Next, close to the first tier make two more similar tiers of one bugle bead and two beaded loops each.
As soon as we’ve made all three tiers, we should make one more beaded loop at the top of the branch. To do it, string 12 seed beads onto the wire
and pass the wire in the opposite direction through the first seed bead of the recent set.
Tighten the wire. We’ve got the first branch of the snowflake.
Before we continue weaving the other branches, we should withdraw the wire to the base of the branch. So, pass the wire backwards through three bugle beads that make up the branch’s axis and immediately after that pass the wire through the round bead at the base of the branch.
Gently pull the wire - the first snowflake’s branch became straight.
Keep on weaving and make five more such branches, placing the each successive branch close to the previous one. For the each branch string onto the wire a round bead first, then string one bugle bead and 12 seed beads and after that continue weaving the branch the same way as the first one.
Now unravel the wire loop around the first round bead and twist together both ends of the wire so that the first and the last round beads lie close to each other.
Then cut the wires off leaving only a small tip. This wire tip will hide itself between the round beads and it will not be seen.
Straighten the branches - the snowflake is finished!
By making different kinds of snowflakes and also by using different colors of beads and bugles, you can create a truly fabulous beaded blizzard!
P.S. If you like this tutorial, share it with your friends on social networks using the buttons below the post.
Don't want to miss new tutorials? Subscribe for email notifications of site updates or follow us on Twitter!


Beautiful and well explained! Thank you! I plan to make this!
ReplyDeletelibby
Thank you, Libby!
DeleteDo you have a printable version of this pattern?
ReplyDeleteSorry, but I haven't. This is my own pattern and I only have a handwritten draft.
Delete