
Today we will make beaded raspberry, a twig and berries.
We will need:
- size 8 seed beads of reddish-pink color,
- size 10 seed beads of green color,
- wire 0.2 mm thick,
- green thread for winding the twig,
- a basket or a bowl which we’ll fill with berries.
To weave berries we will use the technique of three-dimensional beading. We met such a beading technique in our tutorials many times, so I hope you are familiar with it.
The main idea of 3D beading is that the each row in the beadwork consists of two tiers which are situated one above the other. So, at first we make the upper tier of the 1st row, then make the lower tier of the 1st row, after that make the the upper tier of the 2nd row, next make the lower tier of the 2nd row and so on.
For a single berry take a piece of wire 50 cm long. Make the berry out of reddish-pink seed beads.
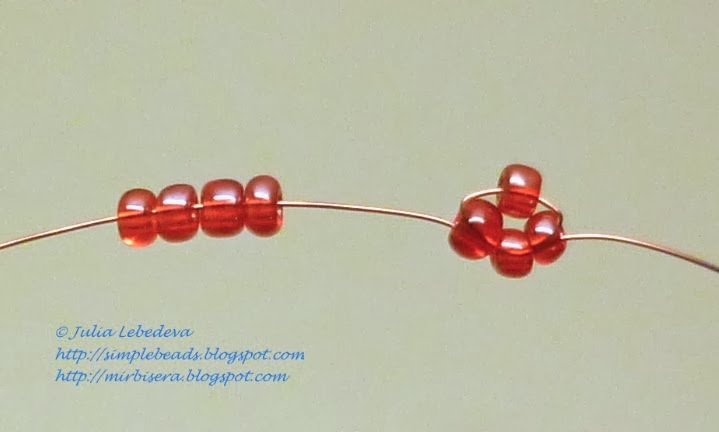
Start weaving. String 4 beads and place them on the middle of the wire.

Take any end of the wire and cross it through the 3 beads from the other end of the wire.

Tighten the ends of the wire trying to keep the beads on the middle of the wire. We’ve got two tiers of the 1st row. The upper tier consists of 1 bead and the lower tier consists of 3 beads.

2nd row:
For the upper tier string 4 beads on any end of the wire
and cross the other end of the wire through all these beads.

Tighten the wire and bend it placing the beads above the lower tier of the 1st row.

To make the lower tier of the 2nd row string 5 beads on any end of the wire

and cross the other end of the wire through all these beads.

Tighten the wire and bend it placing the beads below the upper tier of the current row.

All the other rows make in the same way.
3rd row:
The upper tier: 6 beads.
The lower tier: 6 beads.

4th row:
The upper tier: 7 beads.
The lower tier: 7 beads.

5th row:
The upper tier: 6 beads.
The lower tier: 6 beads.

The berry now looks like this:
Side view:

View at the lower tiers:

Now proceed with making sepals and a stalk. Make them out of green seed beads.
String 3 beads on any end of the wire.

Hold the last added bead and pass this end of the wire backwards through the other 2 beads.

Move all these beads close to the berry and tighten the wire. We’ve got a small green beaded needle that means a sepal.

Now make two more such green needles on the same end of the wire.
For the 2nd needle string 3 beads and, holding the last added bead, pass the wire backwards through the other 2 beads.

Move all these beads to the 1st needle (so that the distance between the needles is about 1-2 mm) and after that tighten the wire.

In the same way make the 3rd green needle, placing it at a distance of approximately 1-2 mm from the 2nd one.


Now leave this end of the wire alone for a while and make the same three green needles on the other end of the wire.

Next, attach the sepals to the berry. Pass one end of the wire through the extreme opposite bead in the upper tier of the last row of the berry (doing so, lead the wire in the outward direction),


and the other end of the wire pass through the extreme opposite bead in the lower tier of the last row of the berry (again, lead the wire in the outward direction).


Then string 1 green bead on any end of the wire

and cross the other end of the wire through it.

Pull both ends of the wire so that the last added bead lies in the center of the upper part of the berry, right between the sepals.


Then continue weaving the stalk of the berry by adding green beads one by one in the same way. For a separate berry make the stalk out of 5 beads.

But if you want to attach the berry to a twig, make a longer stalk. For such berries I made stalks out of 10 beads.

For the each twig make at least three berries.

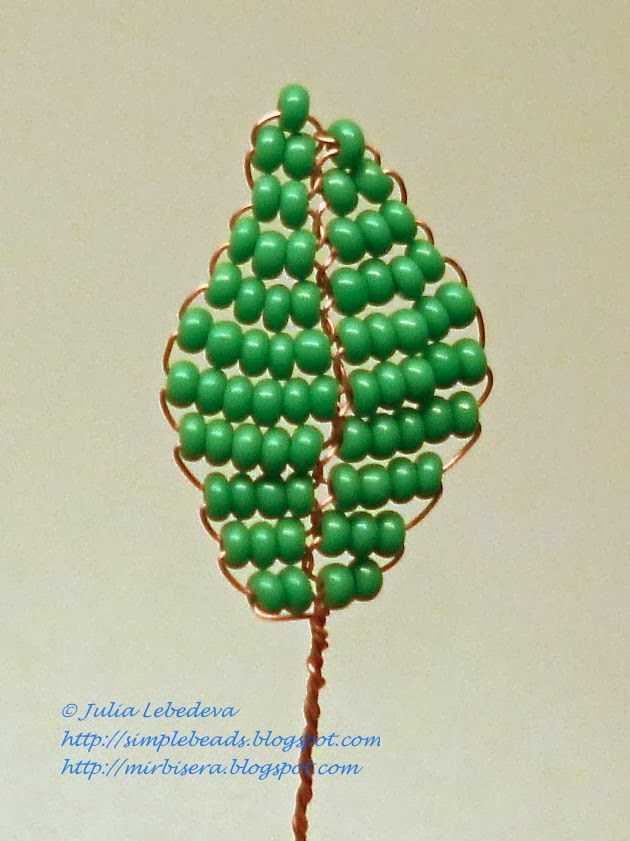
After that make raspberry leaves. Weave them out of green seed beads. The each leaf consists of two halves, for the each of which take a wire 30 cm long.
The first half of the leaf make in flat parallel weaving using the following pattern:
1st row - 1 bead,
2nd row - 2 beads,
3rd row - 2 beads,
4th row - 3 beads,
5th row - 4 beads,
6th row - 5 beads,
7th row - 6 beads,
8th row - 5 beads,
9th row - 4 beads,
10th row - 3 beads,
11th row - 2 beads.

When making the second half of the leaf, plait the each row of it to the first half. We met a similar beading technique in our tutorials a few times, so if you want to recall it, study this tutorial (opens in a new browser tab).
Before you start making the first row of the second half of the leaf, pass the wire for it between the 1st and the 2nd rows of the first half of the leaf. After that start making rows using the following pattern:
1st row - 1 bead,
2nd row - 2 beads,
3rd row - 3 beads,
4th row - 4 beads,
5th row - 5 beads,
6th row - 5 beads,
7th row - 5 beads,
8th row - 4 beads,
9th row - 3 beads,
10th row - 2 beads.
The main thing in this technique is to plait the wire of the second half of the leaf to the first one before the each new row.

After finishing the leaf twist together all the wires under it.
For the each twig make 5 such leaves.

Now start assembling the twig. Take a leaf and wind the wire below it by a green thread for the distance of approximately 1.5 cm.

Then take two more leaves and attach them close to the twig,

pointing them in opposite directions.

After that continue winding the twig by the thread for the distance of 1 cm.

Then take 3 berries, twist together all their wires

and attach this bunch of berries to the twig.

Continue winding the twig by the thread for the distance of approximately 1 cm.

After that attach to the twig two more leaves, pointing them in opposite directions.

Then continue winding the twig by the thread for the necessary length. Next, tie a couple of knots to fix the thread and finally trim the excess wires in the bottom of the twig, if needed.
The raspberry twig is finished!

Using this pattern, you can make a whole shrub of raspberry (though it’s quite a complicated task). As for me, I made several dozen berries and put them in a small bast basket together with a raspberry twig. A lovely composition has turned out!

P.S. If you like this tutorial, share it with your friends on social networks using the buttons below the post.
Don't want to miss new tutorials? Subscribe for email notifications of site updates or follow us on Twitter!
Could you use string for this and still have it work
ReplyDelete